
IKEA FLISAT Table Guide: Setup, Bins & Sensory Play Ideas
Everything a beginner actually needs to know about the IKEA FLISAT sensory table — which TROFAST bins to buy, how the pegboard setup works, and the ways we really use ours — from years of GoodnightFox setups.
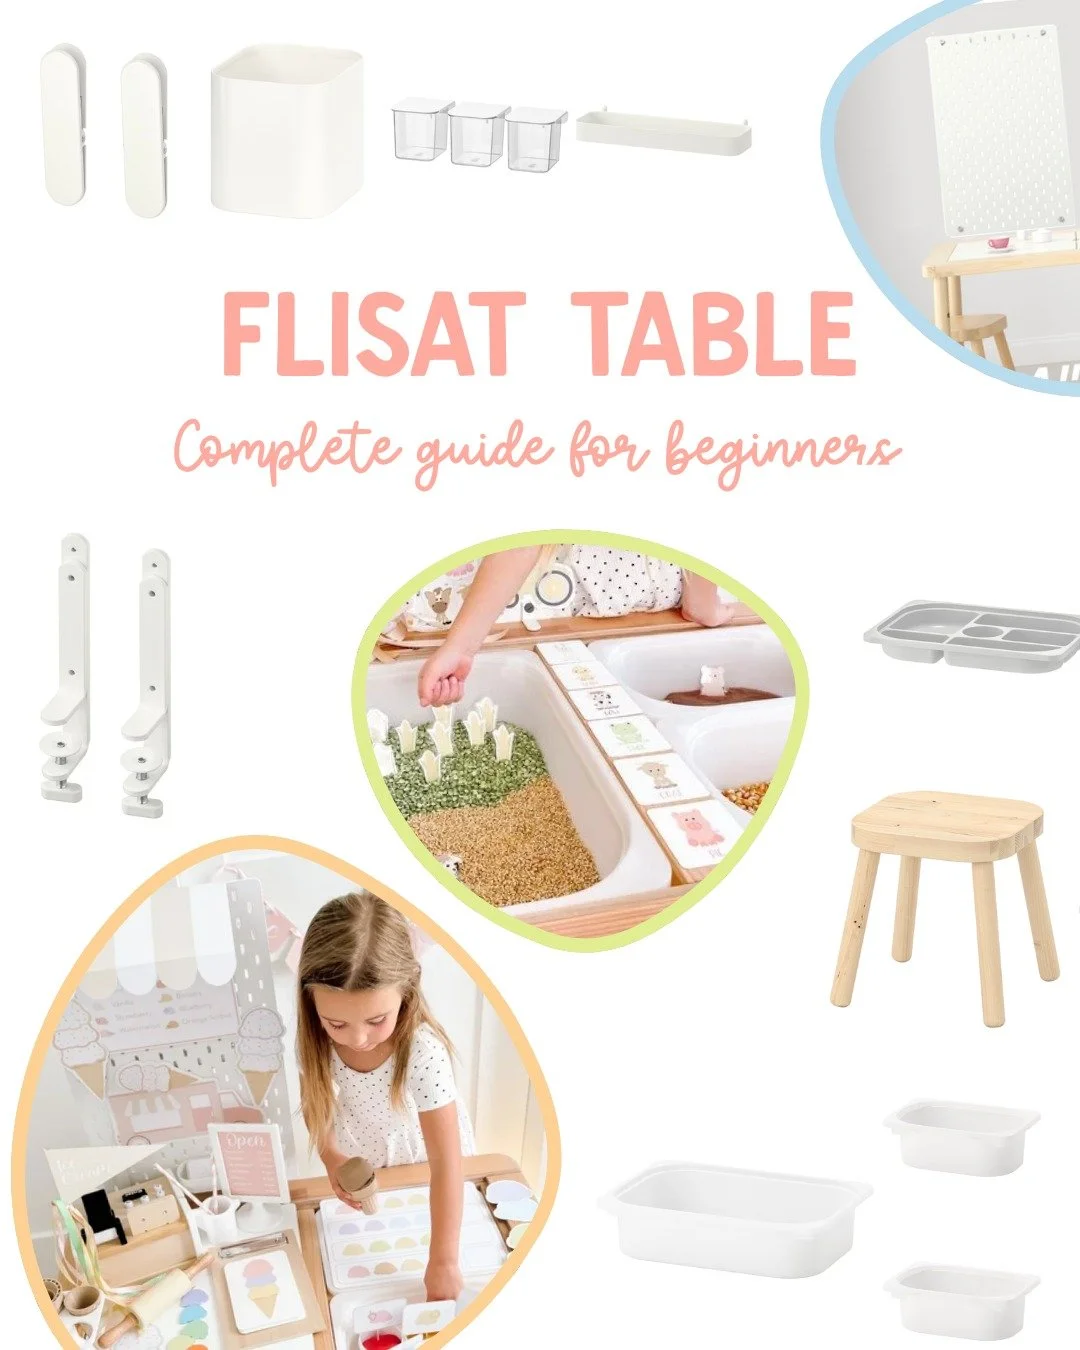
If you keep seeing this little wooden table all over your feed and wondering what you'd actually need to buy, this is the guide I wish someone had handed me. We've used our IKEA FLISAT table for years of GoodnightFox sensory and pretend-play setups — it has been a sensory bin, a bakery, a vet clinic, and an ordinary craft table, sometimes all in the same week.
Here's the short answer first: the core setup is the FLISAT table plus compatible TROFAST bins. Everything else in this article — the pegboard, the trays, the tools — can be added gradually, once you know how your child actually plays. You do not need an elaborate setup to start.
In this guide: What you need · TROFAST bins · FLISAT setup · SKÅDIS pegboard · Accessories · Favorite FLISAT themes · Storage · FLISAT printables · FAQ
What is the IKEA FLISAT table?
The FLISAT is a wooden children's table (32⅝ × 22⅞ inches) whose top is made of two removable lids. Lift the lids and there are two openings underneath, sized to hold TROFAST storage boxes — that's what turns it into a sensory table. Drop the bins in and you have two contained play spaces; put the lids back on and it's a normal children's table for crafts, puzzles, and snacks. That open-and-close design is the whole reason parents use it for sensory play: the mess lives in the bins, and when play is over, the lids go on and the room is a room again.
The table is sold on its own at IKEA (around $99.99 in the US) and the bins are sold separately. Prices change, so check IKEA for current pricing before you go.
What do you actually need to get started?
Less than the internet suggests. Here's how I'd sort the shopping list if I were starting over:
Essential
- The FLISAT table — the table itself, lids included.
- TROFAST bins that fit it — see the next section for exactly which ones, because this is where beginners get stuck.
Helpful (add in the first few weeks)
- Scoops, tongs, and a wide-mouth funnel
- Small containers and cups for pouring and sorting
- A sifter, if you'll mix fillers like rice and beans
- Tape and scissors — for printables, backdrops, and quick fixes
Optional (only if they'll serve your play)
- A SKÅDIS pegboard with connectors/clamps, for backdrops and storage
- Printable awnings, signs, and decor for pretend-play setups
- Extra trays and specialty tools
- A TROFAST frame for storing whole setups (more on that in the storage section)
When I first put our everyday basics together — table, bins, pegboard, and connectors — the total came to about $120, and it's something we've used at least weekly, if not daily, ever since. But the table and bins alone would have been a complete start.
Which TROFAST bins should I buy?
This is the section that saves you a second trip to IKEA. The FLISAT's two openings each fit a TROFAST box with a 16½ × 11¾ inch footprint. That footprint comes in two depths, and there's a half-size box too:
| Bin | Size | Best for |
|---|---|---|
| Large, deep | 16½ × 11¾ × 9 in | One big sensory bin — water play, lots of filler, burying and digging |
| Large, shallow | 16½ × 11¾ × 4 in | The same footprint with less filler to buy and shallower reach for little arms |
| Small | 7¾ × 11¾ × 4 in | Two sit side by side in one opening — separate materials, tools, or activity parts |
Three combinations cover almost everything:
- Two large bins — one per opening. The simplest setup: two different fillers, or filler on one side and tools on the other.
- One large + two small (my basics pick) — if you're going for the basics, I recommend two small bins on one side of the table and one large bin on the other. That enables setups with three different parts. The smaller bins are nice because they don't require as much sensory filler, which can be expensive and messy.
- Mixed depths — a deep bin for the main filler and a shallow one where you want everything visible at a glance.
If you just want the basics and don't have room to store extra supplies, get one large bin and two small ones and you're done. If you want to use the bins for extra playroom storage too, get two or more large ones — they stack and swap easily.
How I set up my FLISAT table
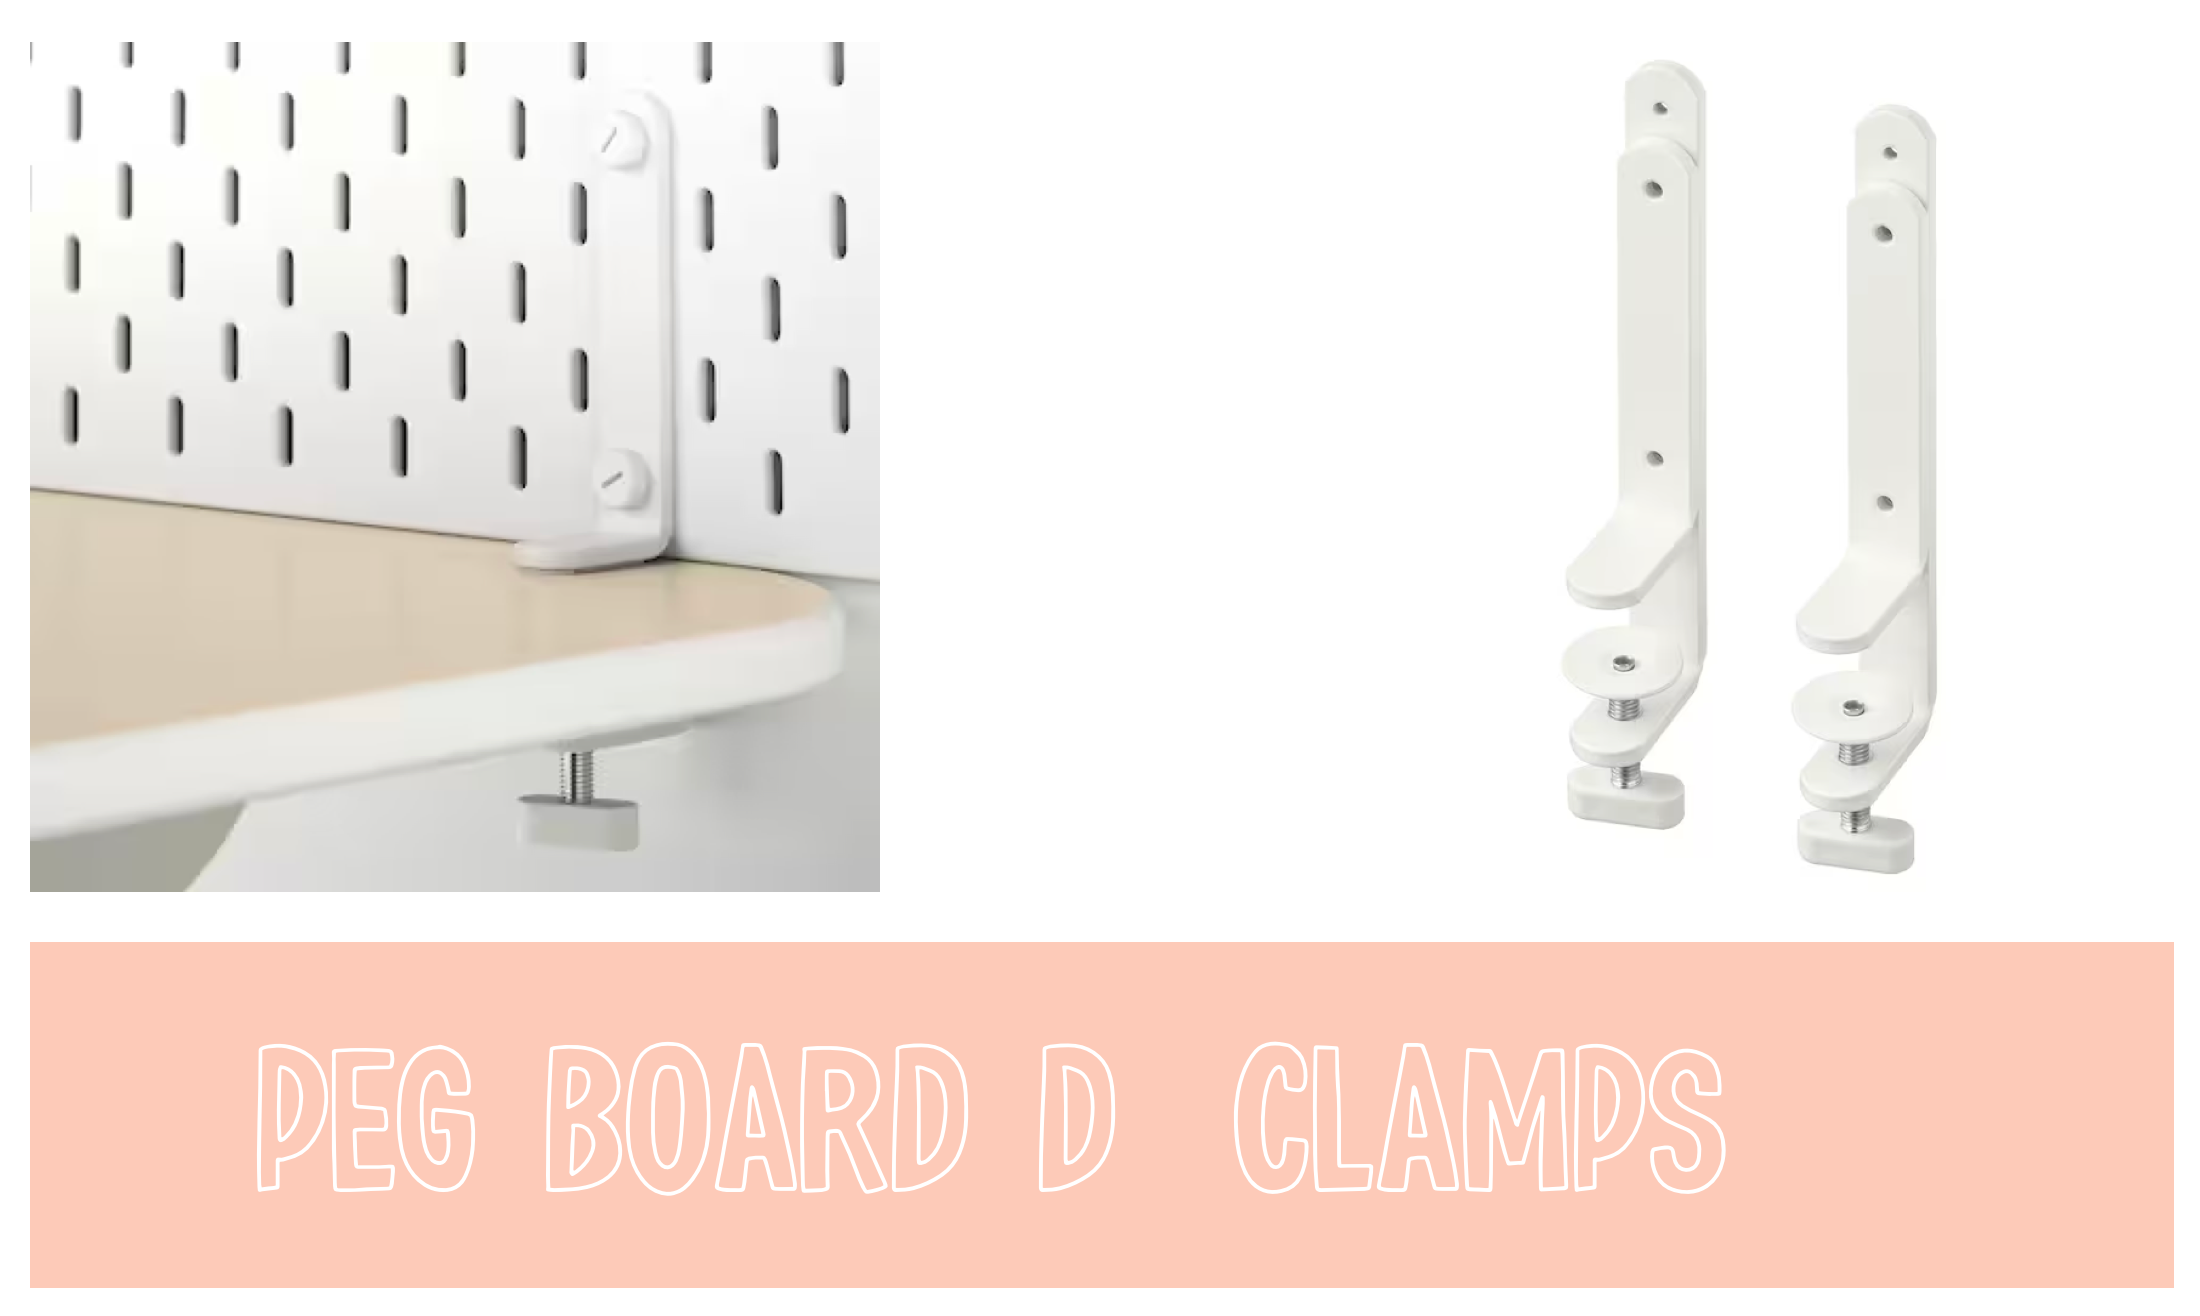
My everyday setup is the table, the one-large-and-two-small bin combination, and the smaller pegboard clamped to the back. Assembly is just IKEA's instructions for the table itself. The pegboard is my own addition: the SKÅDIS connectors (the screw-on D-clamps) secure first to the pegboard and then clamp down onto the table by tightening a screw, which keeps the board upright and secure as a backdrop for displaying sensory table materials.

Should I add a SKÅDIS pegboard?
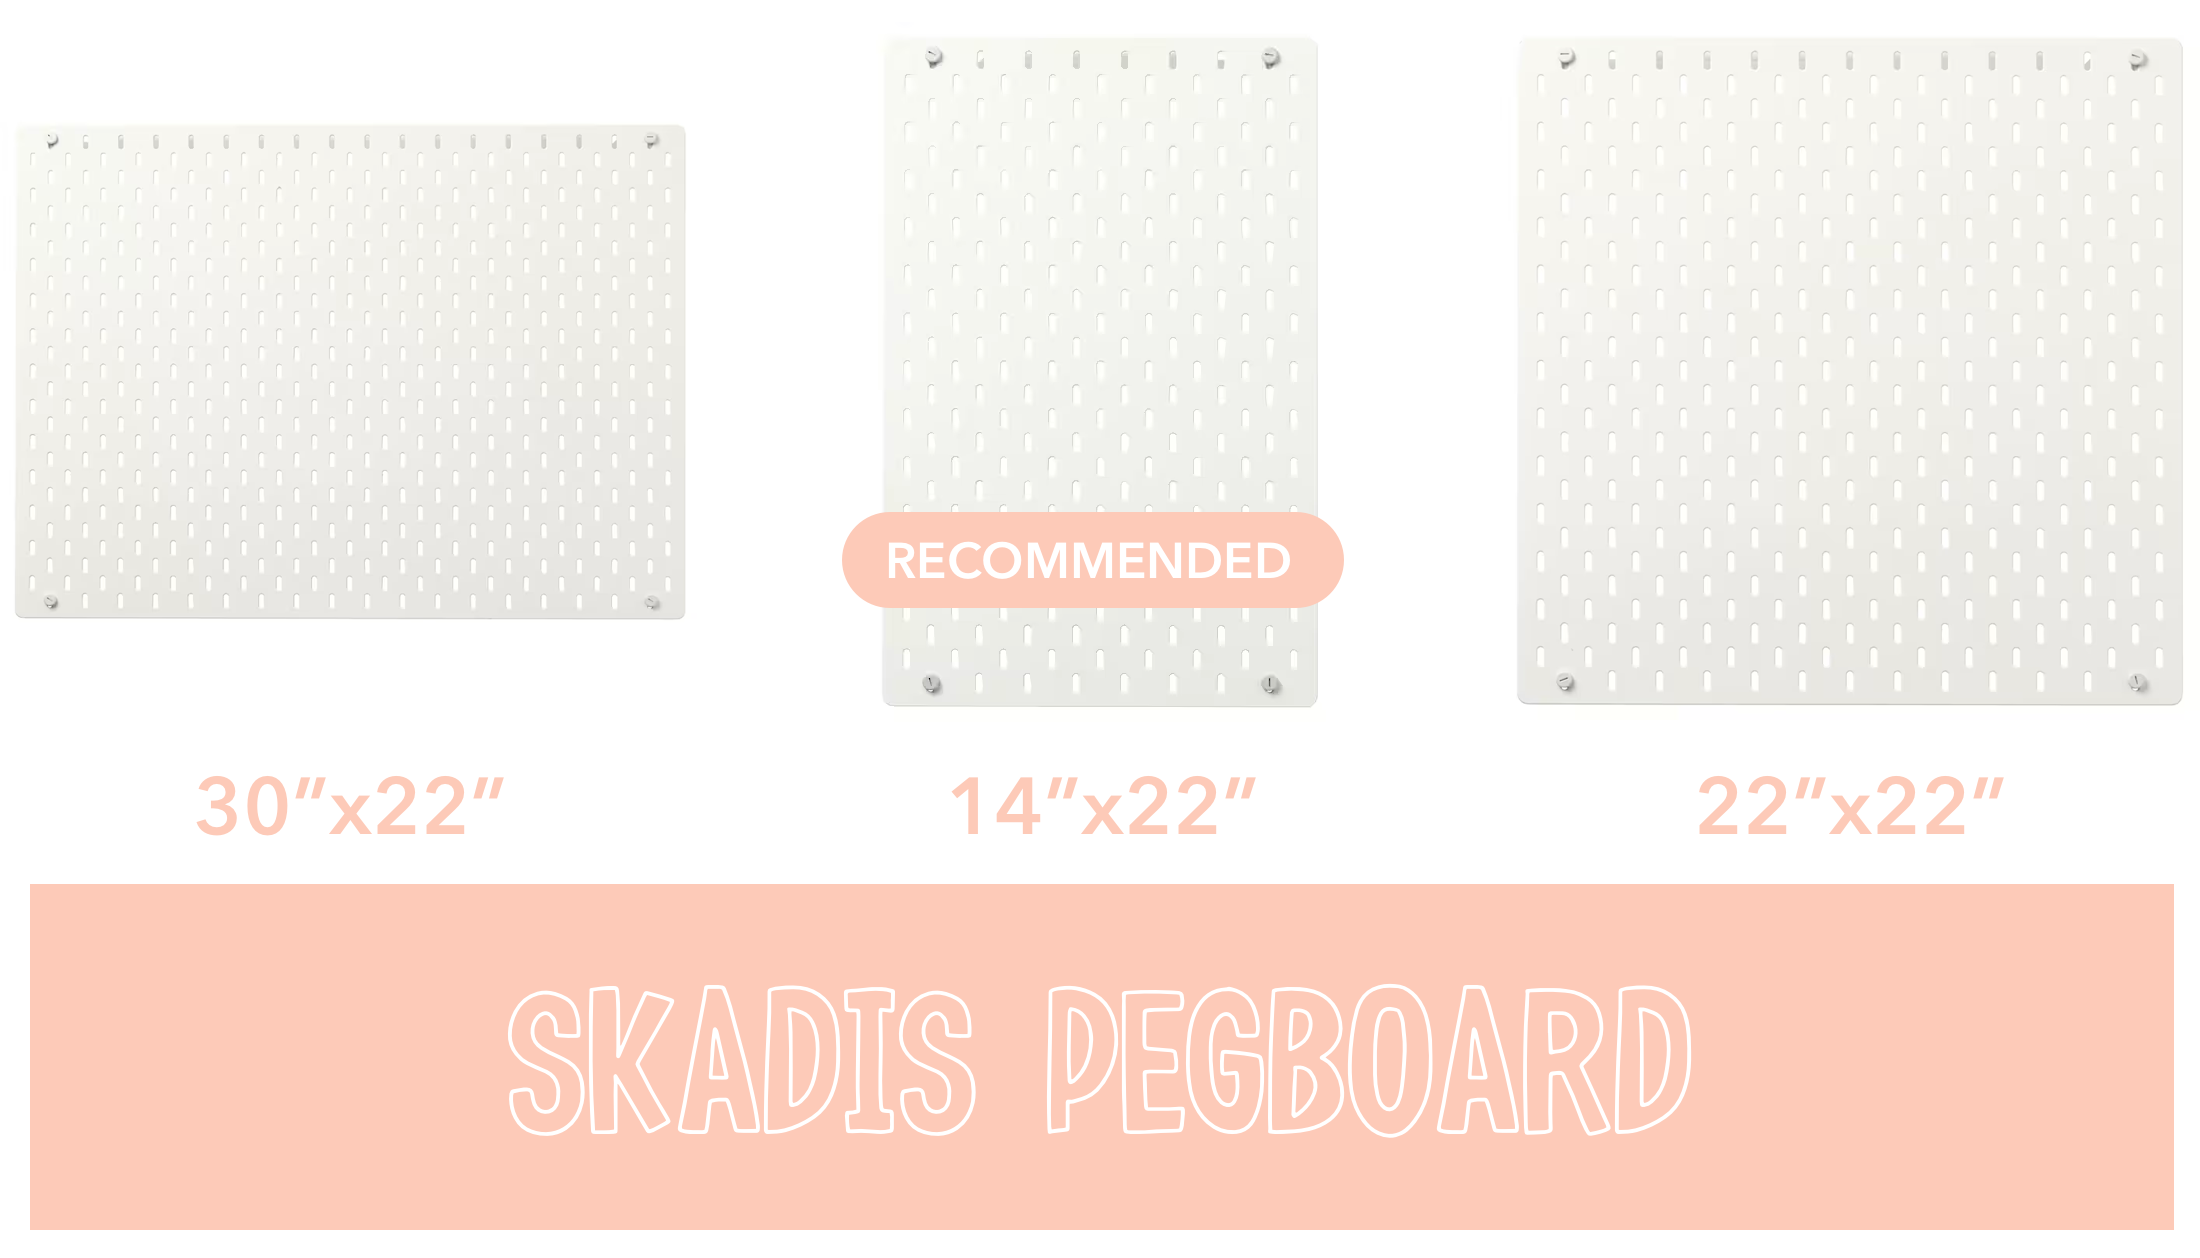
Short answer: not at first — but it's the add-on I get asked about most, so here's my honest comparison of the sizes. One important note: attaching a SKÅDIS to a FLISAT is my own setup, not something IKEA officially recommends. It's a modification plenty of parents make, and it works well for us — just know you're improvising, not following an IKEA pairing.
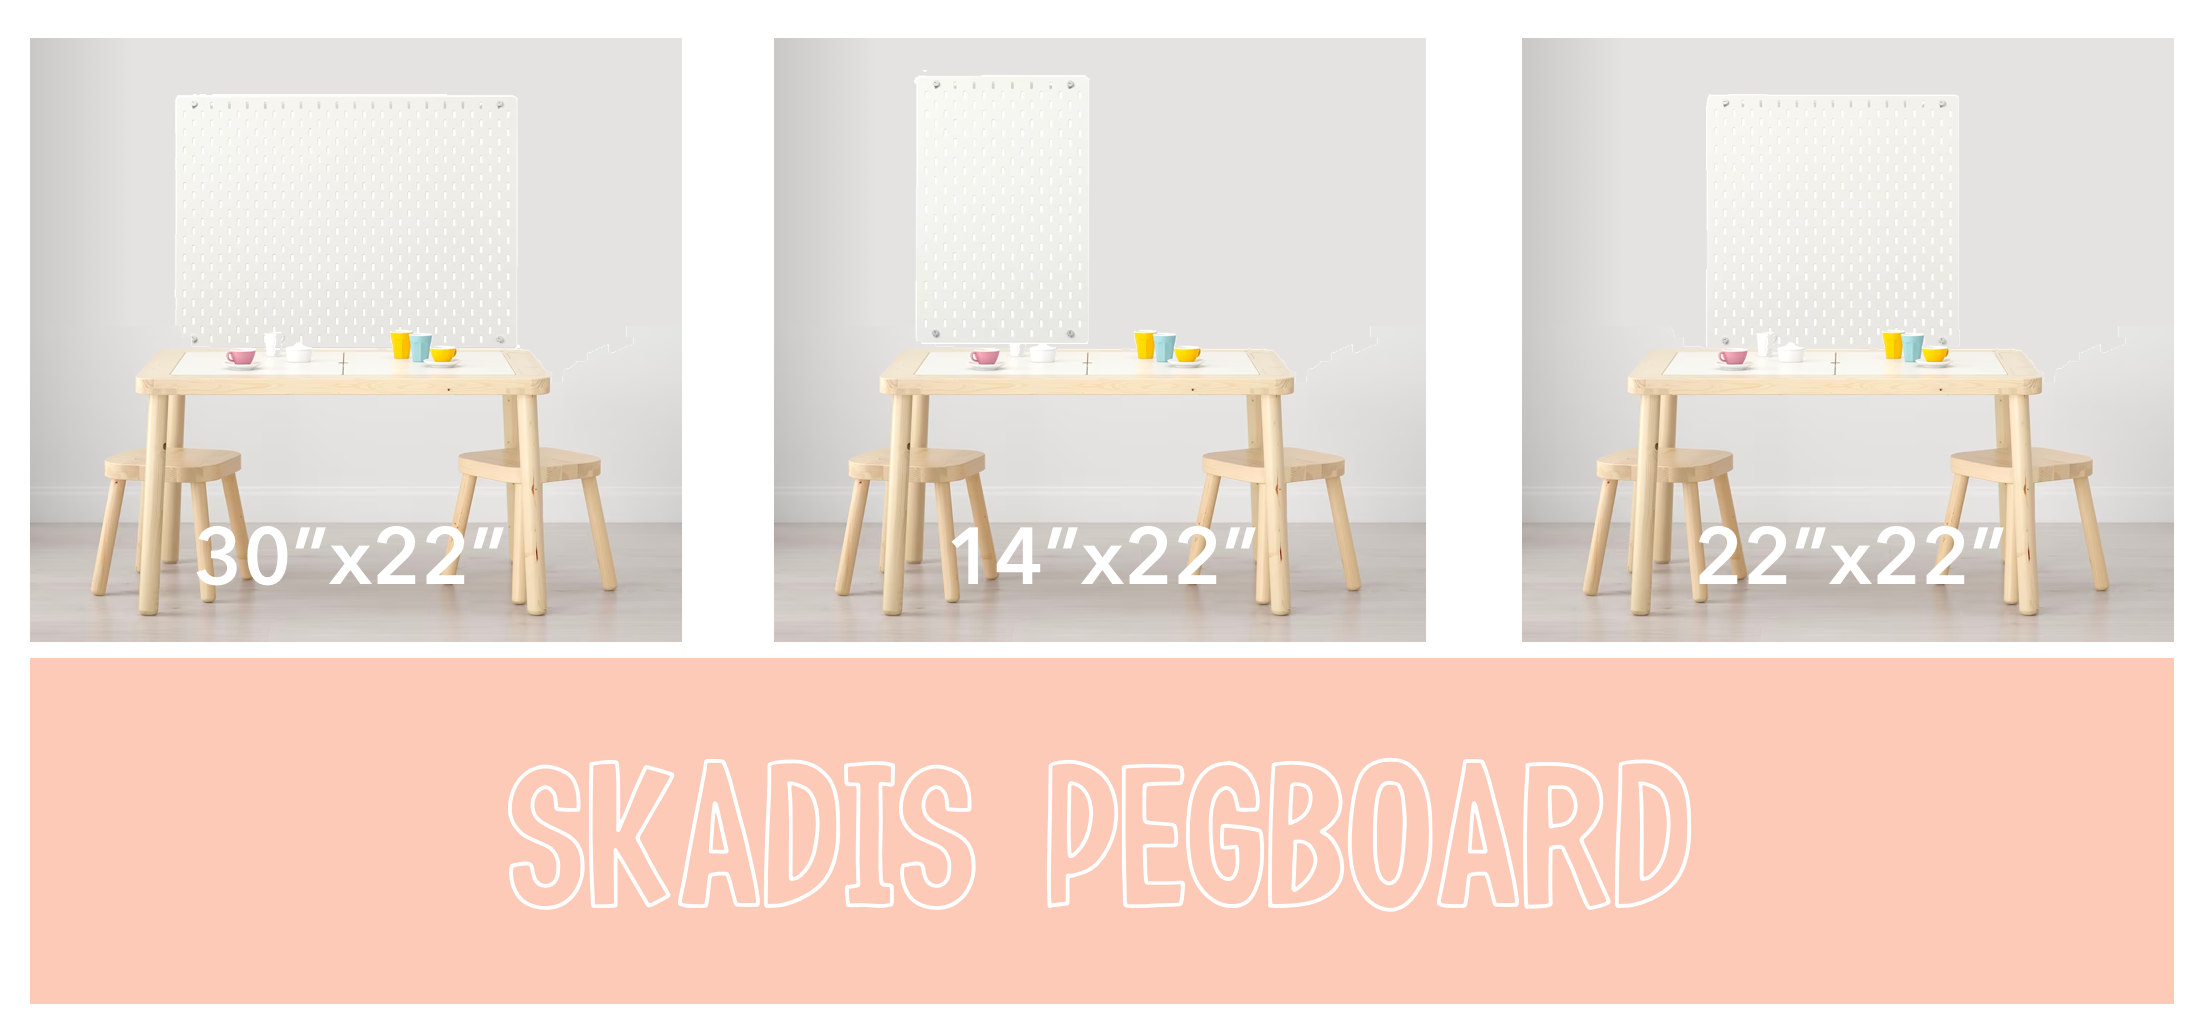
- 14¾ × 22 in (my pick) — I love the smaller pegboard because it can be used upright and allows the child to see around the other side, which matters for dramatic play setups where I'm playing the customer on the opposite side of the "shop."
- 30 × 22 in — the full-sized board is popular if you want your child to sit at the table and play against a full-sized backdrop. More display space, but it walls off the far side.
- 22 × 22 in — the square board, in my opinion, works best on walls for sensory storage materials. This size won't match the length of the table, nor will it give the child much room to see around it.
Why the pegboard earns its place in our house: for most of my GoodnightFox printable play setups, I tape a paper awning to the pegboard to create the look of entering a shop. That one trick — a printed awning, a sign, a backdrop — is what turns a sensory bin into a bakery, a post office, or a vet clinic. The board also holds the small containers and clips in the storage section below.
Is it necessary? No. Plenty of families never add one. Add it when you find yourself wanting backdrops for pretend play, not before.
Best FLISAT accessories (the ones I actually use)
Everything here is something that's earned its space in our playroom — not a shopping list for its own sake. The pattern to notice: most of these are what I think of as activity extenders. When a child starts losing interest in a setup, you don't always need a new setup — you need a new goal inside the old one. A scoop becomes a delivery tool; tongs turn filler into a rescue mission; an empty container invites filling, carrying, and "cooking." Extenders are how one bin of rice lasts three days instead of twenty minutes.
- Sifter — if you plan to work with a mix of textures (rice, beans, chickpeas, sand), this specific tool earns its keep: it sorts small grains from large grains, so you can mix two fillers for play and sort them back out at the end. It's also deeply satisfying to use.
- Wide-mouth funnel — get a pretty wide one for typical fillers like beans and chickpeas. Your kids will get extra use out of funnels in the bathtub too, so it doesn't hurt to have a few extras.
- Scoops and cups — my favorite little cups and sifter are the stackable ones from Inspire My Play, because they save space and match the scoop set. I love silicone scoops because they're soft and flexible.
- Tongs — the classic extender: suddenly everything in the bin needs rescuing, sorting, or serving.
- Tape and scissors — stock up on tape especially if you'll be doing a lot of add-on materials. I use regular Scotch tape for hanging most printables and Scotch packing tape for securing the awning to the pegboard. Keep a pair of kid scissors handy too — little ones love to help, and it's great fine-motor practice.
- TROFAST storage tray — not a must, but a nice-to-have if you like setups neat and orderly. It organizes scoops and spoons, and fits nicely on top of the bins while the fillers sit underneath.
- A wooden serving tray — the little wooden tray from our Plan Toys food set gets used constantly to tote "orders" around in restaurant scenes.
- Inspire My Play tray — I love having this tray for small world play: the dividers create spaces for each part of the setup, and it's very deep, which allows for liquids and other materials.
- Cloud silicone placemat — great for sticky or messy play: slime days, playdough, anything wet. Just note that magnetic sand sticks to this surface and has to be washed off.
- Felt food and a toy cash register — for farmers market, grocery store, and play kitchen setups, felt food adds realistic magic. If you're already making the IKEA trip, their felt sets (vegetables, shopping basket, pizza, cinnamon rolls) are hard to beat on price. And since most of my setups pretend my daughter owns a shop in the real world, a cash register is super handy — we've had one from Crate & Barrel and one from Pottery Barn and loved them both. (Setting up a play kitchen instead? Start with my IKEA play kitchen ideas.)
An easy first FLISAT setup
Don't overthink your first one. Here's the beginner setup I'd hand any new FLISAT owner:
- Put the large bin in one side and the two small bins in the other.
- Fill the large bin with one simple dry filler — rice, dried pasta, or oats.
- Put scoops and cups in one small bin; leave the other small bin empty.
- That's it. Scoop, pour, fill the empty bin, empty it back.
An empty container is a surprisingly powerful invitation — filling and emptying is the whole game at this age. When interest dips, add one extender (tongs, a funnel, a few puzzle pieces to bury and find) before you reach for a whole new theme. And before you choose any setup, know your own non-negotiables: some parents refuse rice or sand in the house, some prefer no sticky or doughy materials, some keep water play outside only. Knowing your limits narrows the search for inspiration in a good way.
FLISAT table ideas from our real setups
Every example below is a real GoodnightFox setup from our own table — these are the posts I send friends when they ask what to do with the table next.
Sensory bins
- Bumblebee sensory table — a spring classic, and a good model of a simple themed bin.
- Fall Frozen sensory bin — a pastel fall setup that mixes a theme kids love with seasonal materials.
- Witch brew sensory play — potion-style mixing play for Halloween.
Pretend and dramatic play
- Cat adoption sensory play setup — the FLISAT as a pet adoption center, pegboard backdrop and all.
- Our bakery setup, built around the book The Smart Cookie — proof that a favorite picture book can become a whole shop.
Small-world play
- Mermaid and ocean small-world play — the table as an underwater scene.
Seasonal play
- 10 winter and Christmas FLISAT table setups — our holiday rotation, from ice skating rinks to hot cocoa stands.

Where does my inspiration come from? Holidays and seasons first. Books, constantly — children's books are a theme factory. Learning concepts (alphabet, counting, shapes, phonics) make easy, purposeful themes. Real-world scenarios — shops and workplaces my daughter can step into — are where she learns the most, playing the part of a shop owner or astronaut, a baker or even a farm animal. And interesting materials: when I found Pluffle, I started hunting for new textures — we've built tables with ace bandages, glow-in-the-dark rocks, and hydrophobic water. Whenever you come across a fun material, even aluminum foil or wax paper, it's worth asking how it could become a setup.
If you don't know where to start, my Sensory Play Calendar is built for exactly this problem: a weekly bin with an associated learning goal, so the planning is done for you.
Pretend play with the FLISAT table
This is where GoodnightFox setups differ from a basic sensory bin. The formula is simple: pegboard or backdrop + printable awning and signs + themed materials in the bins. The awning taped to the pegboard creates the shopfront; menus, signs, and learning cards tell the story; the bins hold the "goods." One week the table is a bakery, the next it's a cat adoption center — the structure stays the same and only the printables change.

If pretend play is your main goal, the printable library is where to dig in — see the printables section below for the full FLISAT collection.
Our most-loved FLISAT themes
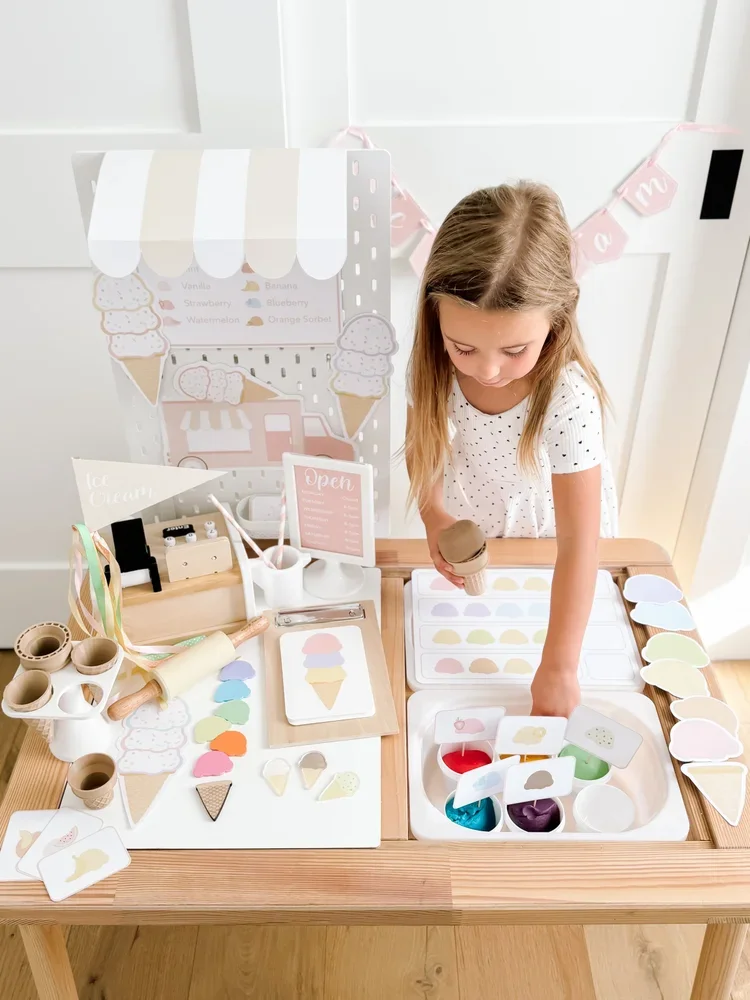
Not sure which theme to try first? Start where our readers and customers start. These are the setups that get played, saved, and bought the most — the Ice Cream Shop kit is the best-selling product in our whole shop, and the vet clinic and bakery are among our most-read pretend play posts. Each one is a $5 printable kit that pairs with the blog post showing our real setup.
Ice Cream Shop
Signs, menus, order slips, mix-and-match scoops, and pretend money — the table becomes a working ice cream parlor. This is the kit that outsells everything else we make, and the setup our readers ask about most.

Vet Clinic
A teal-and-coral animal clinic with a striped awning, patient intake forms, an X-ray board, and a waiting room sign. Stuffed animals check in, get examined in the bins, and recover in style. Our vet clinic post is one of the most-saved setups on the blog.

Bakery
The natural first shop: an awning on the pegboard, cakes and cookies in the display case, an order form at the register. It's the setup I built around my daughter's favorite picture book, The Smart Cookie — and bakery themes are perennial best sellers in the shop.

Hot Cocoa Stand
Our winter anchor: a cozy cocoa stand with menus, toppings, a fractions cup for pouring practice, and paper money. It comes back every winter in our FLISAT rotation, in classic red-and-green or peppermint red-and-white.
FLISAT ideas by age
The table doesn't change as kids grow — the complexity inside it does. Babies and young toddlers start with one filler and big scoops; preschoolers are ready for multi-part setups, sorting and counting goals, and full pretend-play worlds with menus and money. Age is only a rough guide, though: what matters is choosing materials appropriate for your child and supervising actively, especially with anything small enough to be a choking hazard. For a fuller breakdown, see the sensory play by age guide on Sprout.
Sensory materials and safety
A quick word on filler safety, because the internet is loose with this. Some sensory-play resources describe food-based fillers as "taste-safe," but food-based materials can still present choking, allergy, and other risks — "it's food" is not the same as "it's safe unsupervised." What I actually did when my daughter was in the mouthing-everything phase: I chose food-based sensory materials, like cooked rice and beans, dry pasta, dry baking ingredients, and homemade playdough — and I stayed right there while she played. Keep materials age-appropriate, check for allergies before using food fillers, pull anything that's a choking hazard for your child's stage, and treat supervision as part of the activity, not an extra.
How I store FLISAT and sensory play supplies
Storage is what decides whether sensory play happens weekly or never. Taking down and putting up new setups takes time, and you'll end up wondering where it all goes. Here's the system that survived years of weekly rotations:

- Plastic stackable bins (Target) — I put GoodnightFox flashcards at the front of each bin so I can remember what theme is inside without creating labels.
- Photo storage bins — amazing for sorting flashcards plus one simple sensory supply. I use them for weather acrylics, bees, wool balls, fruit erasers, and all the little wooden bits and bobs you'll end up acquiring; each small box fits neatly into the large box so you can see and access everything. I keep a set of activities stored in my car at all times — super handy for a restaurant solution or something to keep attention in line at the doctor's office.
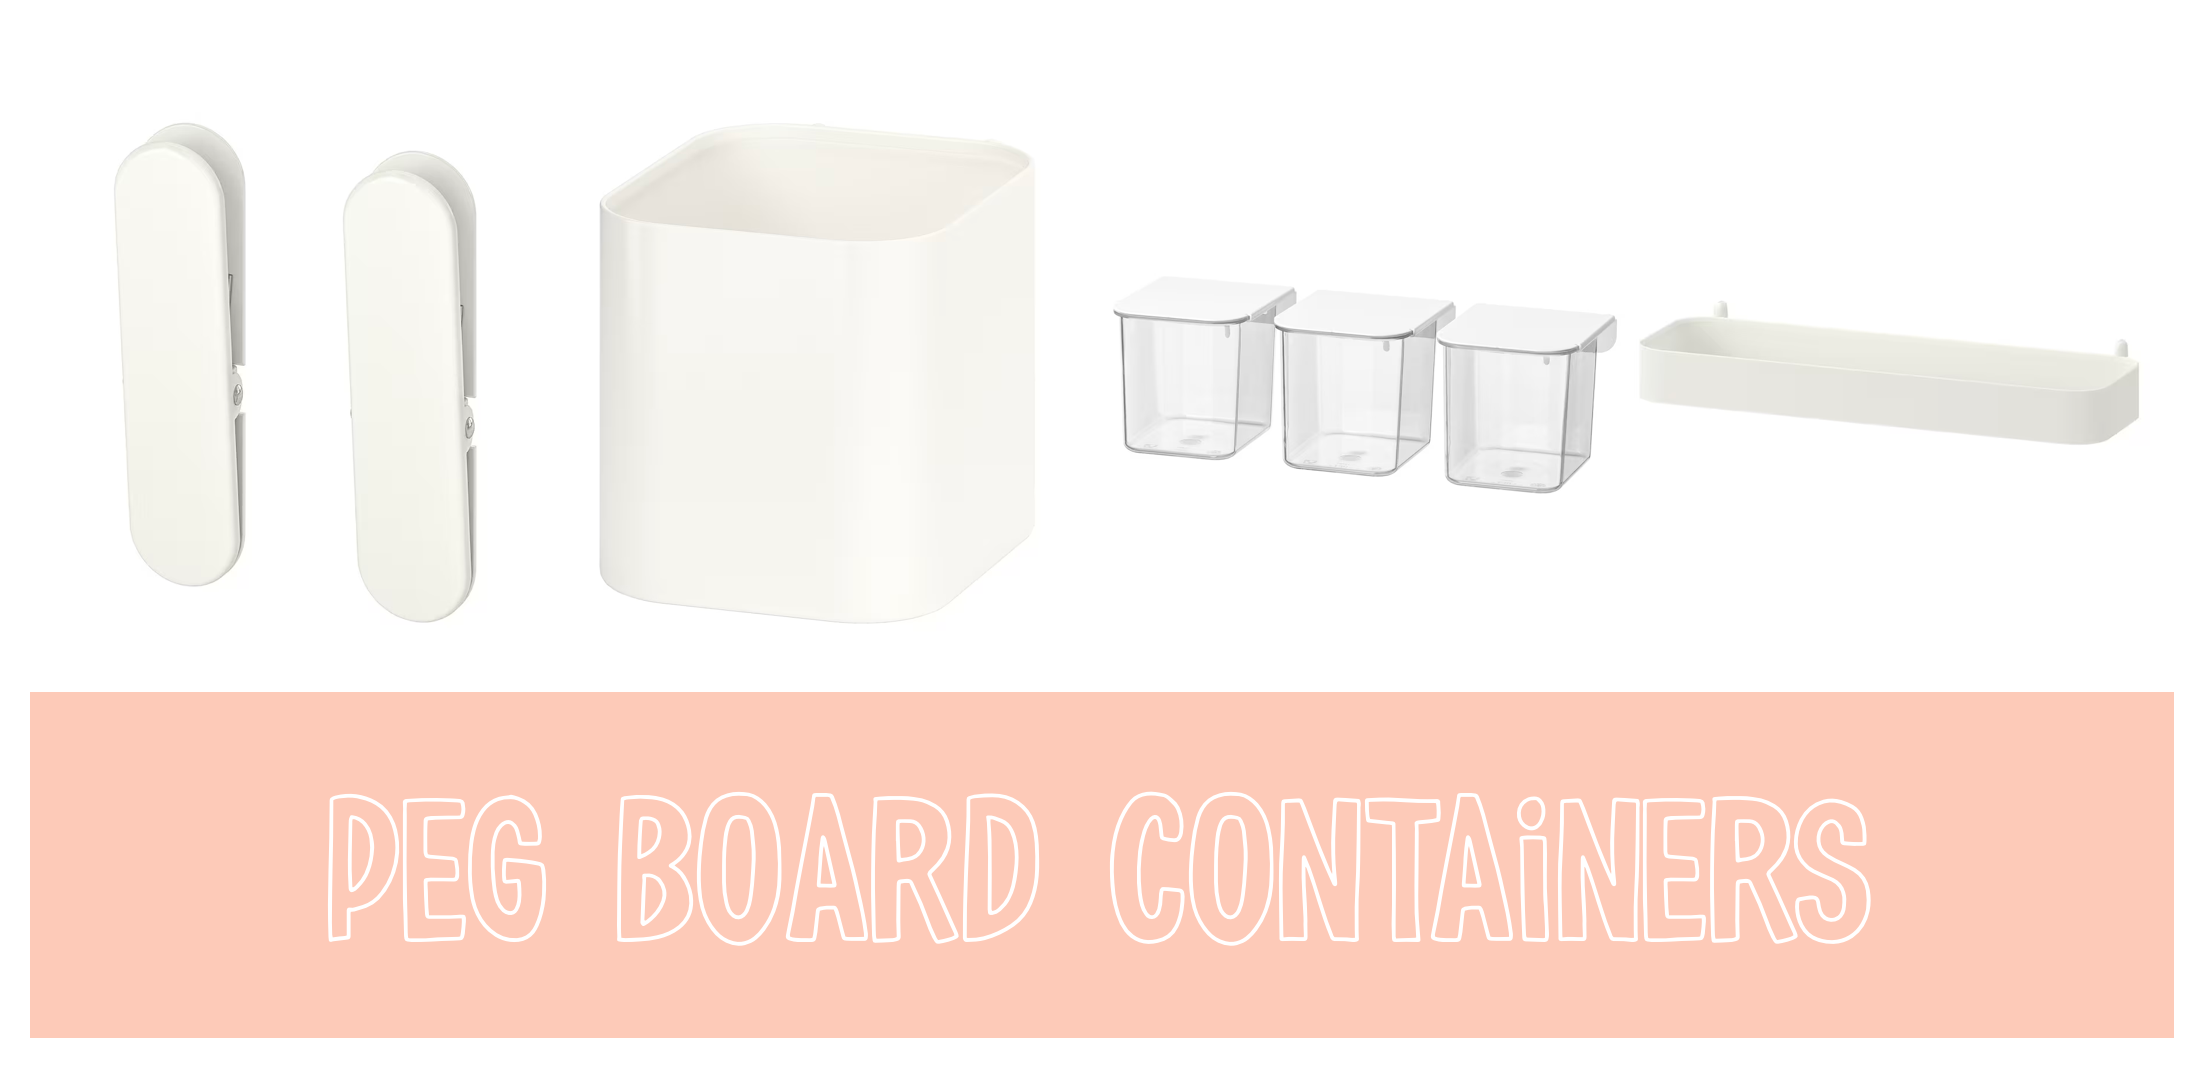
- SKÅDIS pegboard containers — you'll want containers you can grab quickly for smaller supplies and fillers. I love the SKÅDIS drawer containers because they're so accessible. The little white containers are super handy too, especially if the table does double duty for art supplies (markers, pens, stamps). The white shelf can come in handy but doesn't hold much, so have a clear purpose in mind — for me it's just a catch-all. The white clips are handy for hanging flashcards and reference materials, but if I'm being honest, I just prefer to tape things directly to the board because it saves space.
- TROFAST frame — if you're going all out, I highly recommend this storage unit. The fastest, most convenient sensory play storage option is hands down throwing everything for a setup into a TROFAST bin and sliding it into the frame. Take it from me: I did this for years with containers in a closet, and I wish I'd had the shelf option sooner.
Where to find FLISAT printables
This blog is the editorial side of GoodnightFox — my experience, my setups, my honest recommendations. Sprout is the structured play library: the printable setups themselves, organized so you can find one by theme and print it today. If you're looking for printable awnings, signs, menus, and full pretend-play setups sized for this table, start with the FLISAT printables and sensory table ideas guide on Sprout — it's the collection that pairs with everything in this article.
And if you already know your child will want the next shop, and the next: the four themes above — plus more than 70 others — are all inside the Ultimate Pretend Play Bundle, our complete library of printable play kits.
Frequently asked questions
What bins fit the IKEA FLISAT table?
TROFAST storage boxes with a 16½ × 11¾ inch footprint — in either the shallow (4 in) or deep (9 in) version. Two small TROFAST boxes (7¾ × 11¾ in) also fit side by side in one opening.
Can you use the FLISAT table without TROFAST bins?
Yes. With the lids on, it's a regular children's table for crafts, puzzles, and play trays. The bins are what make it a sensory table — they drop into the openings to hold fillers — but nothing about the table requires them day to day.
What do I need for a FLISAT sensory table?
The table, TROFAST bins that fit, one filler (rice, pasta, oats, water), and a few tools like scoops and cups. Everything else — pegboard, trays, printables — is optional and can come later.
Is a pegboard necessary for a FLISAT table?
No. It's my favorite optional add-on because it holds backdrops and awnings for pretend play, but the table works completely without one. Add it when you start wanting shop-style setups.
How often should I change a sensory table setup?
I change ours up about once a week — but if an activity is inspiring a lot of play, I'll leave it up for a few weeks. Let's face it, we all get busy, and sometimes there isn't time to cycle weekly. Some parents who homeschool set up a new activity every day; find the rhythm you'll actually keep.
What can I put in a FLISAT sensory table?
Dry fillers (rice, beans, chickpeas, pasta, oats), water, playdough, kinetic sand, and themed materials — plus tools like scoops, tongs, and funnels. For younger toddlers, food-based fillers with close supervision are the usual starting point.
Can the FLISAT be used for pretend play?
Absolutely — it's our main pretend-play stage. Add a backdrop or pegboard with a printable awning, put themed materials and felt food in the bins, and the table becomes a bakery, a market, a vet clinic, or an adoption center.
Where can I find FLISAT printables?
On Sprout, our structured play library — the FLISAT printables and sensory table ideas guide collects the printable setups that pair with this table.
The FLISAT is not magic furniture. It's a simple, sturdy table that makes sensory and pretend play easy to start and easy to clean up — which, in a real house with a real toddler, is what decides whether play happens at all. Start with the table and bins. Add the rest when the play asks for it. And if you build a setup you love, I genuinely want to hear about it.